mini pcにProxmox Virtual Environment 8.3.1インストールしたので、ついでにダッシュボードでcpu温度表示できるようにしてみました。
前提条件
- Proxmox VE 8がインストール済み
- root権限でのアクセス
1: lm-sensorsのインストール
apt install lm-sensors
2: センサーの動作確認
インストール後、センサーが正常に動作するか確認します:
sensors
3: Nodes.pmの修正
APIファイルを編集してサーマル情報を取得できるようにします:
vi /usr/share/perl5/PVE/API2/Nodes.pm
/dinfoで検索してジャンプ(569行目あたり):
my $dinfo = df('/', 1); # output is bytes
この上に以下の行を追記:
$res->{thermalstate} = `sensors -j`;

my $dinfo = df('/', 1);     # output is bytes
4: pvemanagerlib.jsの修正
ダッシュボードに温度表示を追加するため、JavaScriptファイルを編集:
vi /usr/share/pve-manager/js/pvemanagerlib.js
/pveversionで検索(45045行目あたり)
{
    itemId: 'version',
    colspan: 2,
    printBar: false,
    title: gettext('PVE Manager Version'),
    textField: 'pveversion',
    value: ''
},
の下に下記を追加
Intel CPUの場合:
{
    itemId: 'thermal',
    colspan: 2,
    printBar: false,
    title: gettext('CPU Thermal State'),
    textField: 'thermalstate',
    renderer: function(value) {
        let objValue = JSON.parse(value);
        let core0 = objValue["coretemp-isa-0000"]["Core 0"]["temp2_input"];
        let core1 = objValue["coretemp-isa-0000"]["Core 1"]["temp3_input"];
        let core2 = objValue["coretemp-isa-0000"]["Core 2"]["temp4_input"];
        let core3 = objValue["coretemp-isa-0000"]["Core 3"]["temp5_input"];
        return `Core 0: ${core0}°C | Core 1: ${core1}°C | Core 2: ${core2}°C | Core 3: ${core3}°C`;
    }
}
AMD Ryzen CPUの場合:
{
    itemId: 'thermal',
    colspan: 2,
    printBar: false,
    title: gettext('CPU Thermal State'),
    textField: 'thermalstate',
    renderer: function(value){
        const tdie = value.match(/Tdie.*?\+([\d\.]+)/);
        const tctl = value.match(/Tctl.*?\+([\d\.]+)/);
        return `Tdie: ${tdie ? tdie[1] : 'N/A'}°C | Tctl: ${tctl ? tctl[1] : 'N/A'}°C`;
    }
}
ただ自分の環境のmini pc (Beelink SER5 5600H) では上記で対応できなかったので、sensor -jで確かめてみたところ
{
  "amdgpu-pci-0400": {
    "Adapter": "PCI adapter",
    "vddgfx": {
      "in0_input": 1.012
    },
    "vddnb": {
      "in1_input": 0.912
    },
    "edge": {
      "temp1_input": 78.0
    },
    "PPT": {
      "power1_input": 34.0
    }
  },
  "nvme-pci-0300": {
    "Adapter": "PCI adapter",
    "Composite": {
      "temp1_input": 48.85,
      "temp1_max": 81.85,
      "temp1_min": -273.15,
      "temp1_crit": 84.85,
      "temp1_alarm": 0.0
    },
    "Sensor 1": {
      "temp2_input": 48.85,
      "temp2_max": 65261.85,
      "temp2_min": -273.15
    },
    "Sensor 2": {
      "temp3_input": 44.85,
      "temp3_max": 65261.85,
      "temp3_min": -273.15
    }
  },
  "mt7921_phy0-pci-0200": {
    "Adapter": "PCI adapter",
    "temp1": {
      "temp1_input": 58.0
    }
  },
  "k10temp-pci-00c3": {
    "Adapter": "PCI adapter",
    "Tctl": {
      "temp1_input": 90.625
    }
  }
}
となっていたので、
{
  itemId: 'thermal',
  colspan: 2,
  printBar: false,
  title: gettext('CPU Thermal State'),
  textField: 'thermalstate',
  renderer: function(value) {
    let objValue = JSON.parse(value);
    let tdie = '';
    if ("coretemp-isa-0000" in objValue) {
      tdie = objValue["coretemp-isa-0000"]["Package id 0"]["temp1_input"];
    } else if ("k10temp-pci-00c3" in objValue) {
      tdie = objValue["k10temp-pci-00c3"]["Tctl"]["temp1_input"];
    } else {
      tdie = value;
    }
    return `Tctl: ${tdie}° C`;
  }
},
としました。
5: Proxmoxサービスの再起動
変更を適用するため、Proxmoxサービスを再起動します:
systemctl restart pveproxy
systemctl restart pvedaemon
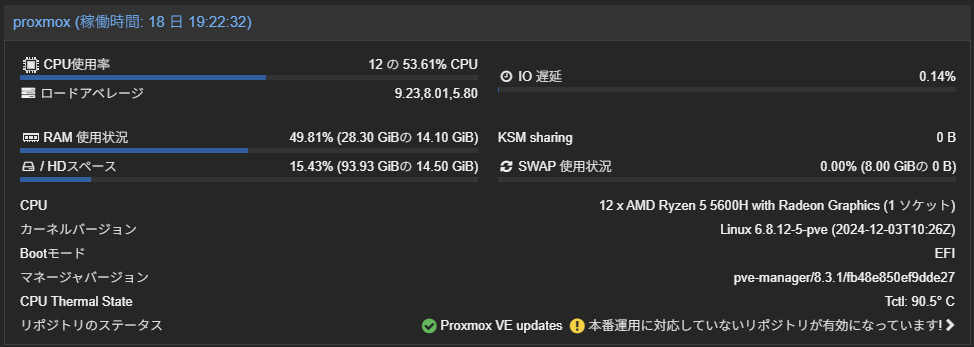
6: 画面確認
注意事項
- CPU温度の表示形式は、使用しているCPU(Intel/AMD)によって異なる。
sensors -jコマンドの出力形式を事前に確認する。- システムアップデート時に設定が上書きされる可能性があるため、バックアップを取っておくことを推奨。